Removing the shock absorber top nut is a critical step in shock absorber replacement or suspension repair.
While it may seem challenging, with the right tools and guidance, you can do it yourself.
In this article, we’ll walk you through the process, list the necessary tools, and provide tips for a smooth, safe removal.
How to remove shock absorber top nut?
To remove the shock absorber top nut, use a wrench or socket to loosen the nut while holding the shock absorber shaft with a vice grip. Make sure to remove any rust before proceeding.
Key Takeaways
- The shock absorber top nut is typically located at the top of the shock absorber and requires proper tools for removal.
- Incorrect handling of the top nut can lead to damage or injury, so it’s crucial to follow the correct procedure.
- Regular suspension checks and repairs can improve vehicle performance and safety.
Why You May Need to Remove the Shock Absorber Top Nut

The shock absorber top nut holds the shock absorber in place on the vehicle’s suspension system.
Over time, the shock absorber may wear out due to driving conditions, road bumps, or age. When this happens, it needs to be replaced to maintain the vehicle’s stability and handling.
Sometimes, removing the shock absorber top nut is also necessary during suspension upgrades or repairs.
It is usually done in conjunction with other suspension component replacements, such as coil springs or struts.
Tools You’ll Need for the Job
To remove the shock absorber top nut, you’ll need a few basic tools. While some vehicles may require more specialized tools, the following list should cover most scenarios:
Socket Wrench: A socket wrench is essential for loosening the nut. Ensure you have the correct size socket to fit the top nut
Torque Wrench: After loosening the top nut, a torque wrench is necessary to reinstall it to the proper torque specification
Spring Compressors: In some cases, the shock absorber may be under pressure, and spring compressors are necessary to safely remove and replace the shock absorber
Pry Bar or Hammer: Sometimes, the shock absorber may need a bit of help in terms of releasing from its mount, and a pry bar or hammer can be useful
Penetrating Oil: If the shock absorber top nut is rusty or difficult to remove, applying a penetrating oil like WD-40 will help loosen the corrosion
Protective Gloves and Safety Glasses: Always wear gloves and safety glasses to protect yourself from sharp edges or any flying debris.
Step-by-Step Instructions: How to Remove the Shock Absorber Top Nut
Here’s a step-by-step guide to removing the shock absorber top nut safely and effectively.
Step 1: Raise the Vehicle and Secure It
Before starting any work on your vehicle, ensure that it is safely raised off the ground. Use a jack to lift the car and secure it with jack stands to prevent any accidental drops.
Ensure that the vehicle is stable before working underneath.
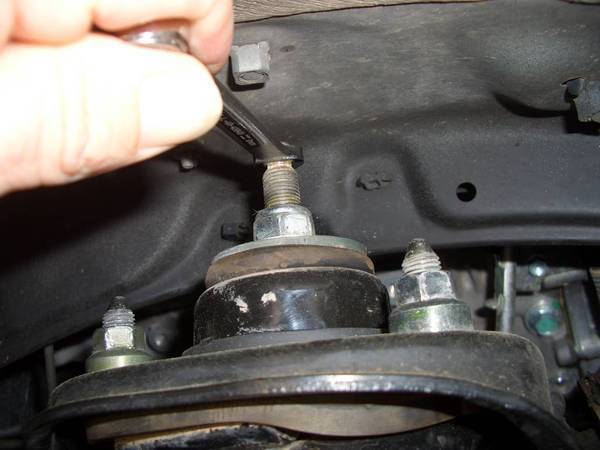
Step 2: Locate the Shock Absorber Top Nut
The shock absorber top nut is located at the top of the shock absorber, typically near the suspension mounting point.
It may be accessible under the hood or inside the wheel well, depending on the design of your vehicle.
Tip: Make sure you have clear access to the top nut. You may need to remove any obstructions like plastic covers or other parts to reach the shock absorber.
Step 3: Apply Penetrating Oil
If the top nut is rusty or stuck, spray a generous amount of penetrating oil on the nut and the surrounding area.
Let it sit for a few minutes to help break up the rust or corrosion. This step can save you a lot of time and effort when it comes to loosening the nut.
Tip: For extremely stubborn nuts, let the penetrating oil sit for 15–20 minutes and repeat the application if necessary.
Step 4: Loosen the Top Nut
Using your socket wrench, place the appropriate socket on the shock absorber top nut and begin to loosen it.
Apply firm, steady pressure to break the nut free. It may take some time and effort, especially if the nut is rusted or if it’s a tough material.
Tip: If the nut resists, use a hammer to gently tap the end of the socket wrench handle to help loosen it. Avoid using excessive force to prevent damaging the nut or the shock absorber.
Step 5: Hold the Shock Absorber in Place
Once the top nut starts to loosen, you’ll need to hold the shock absorber in place to prevent it from spinning while you continue to loosen the nut.
Some shock absorbers may have a hexagonal top that allows you to hold it with a wrench while loosening the nut.
Tip: If the shock absorber spins, use a vice grip to clamp the shaft while you continue loosening the nut.
Step 6: Remove the Top Nut
After loosening the top nut enough, you should be able to remove it completely by hand. Carefully unscrew the nut and keep it in a safe place for reinstallation or replacement.
Tip: Keep track of any washers or other components that may be part of the top nut assembly. Make sure they’re not lost during the process.
Frequently Asked Questions
1. Can I replace the shock absorber top nut myself?
Yes, replacing the shock absorber top nut is something that can typically be done yourself if you have the proper tools and knowledge. Just make sure to follow the right steps carefully.
2. What happens if the shock absorber top nut is too tight?
If the nut is too tight, apply more penetrating oil and give it time to work. If necessary, use a breaker bar for extra leverage, but be careful not to damage the components.
3. How often should I replace shock absorbers?
Shock absorbers generally need to be replaced every 50,000 miles, but this can vary based on driving conditions. Always inspect your suspension system regularly for signs of wear or damage.
Conclusion
Removing the shock absorber top nut is an essential step in replacing or maintaining the shock absorber system in your vehicle.
Whether you’re handling the task yourself or seeking professional help, understanding the process can make the job easier and more efficient.
With the right tools, patience, and care, you can ensure that your vehicle’s suspension system operates smoothly for a comfortable ride.